NAfME BLOG
A Dozen Fun, Productive, Refreshing Activities to Help Recharge Your Ensemble
/ News Posts / A Dozen Fun, Productive, Refreshing Activities to Help Recharge Your Ensemble
When the Thrill Is Gone:
A Dozen Fun, Productive, Refreshing Activities to Help Recharge Your Ensemble
By NAfME Member Robin Linaberry
I remember having the greatest plan. “What a triumph—the concert last night was great! I don’t think the students have ever done better; I just can’t wait for them to hear their recording!” Yes, I was sure it would be a joyous day. It wasn’t just a disappointment, then, but a true heartbreak when I detected that the students weren’t interested. I had expected them to quietly analyze their performance; of course, they’d be charting a course toward their own improvement. But instead, the class period dissolved into an increasing hum of side conversations. The concert playback became just a secondary accompaniment to the students’ collective agenda. They saw it as “a day off.”
I’ll bet you’ve lived this day: Your greatest intentions and most innovative lesson plans simply fall flat. Students can just reach a limit, unexpectedly and inexplicably. What do we do??
In my case, I began to pay closer attention to each group’s level of collective maturity. By constantly assessing their capacity for attentiveness, I learned to predict whether a post-concert listening experience would work. Simultaneously, I began to build a repertoire of alternate activities that would still be engaging, educationally productive, and even fun for the students. Sure, my intention was to address the less-mature groups on the day after a concert. However, I discovered that some of these optional lesson plans are also superb for any ensemble class, on any day, for a variety of reasons. We frequently encounter situations that demand a restorative approach. Sometimes a well-timed diversion can propel students out of the doldrums, and help them leave your class thinking, “That was really cool … I can’t wait for tomorrow’s class!”
Although these are specific suggestions, written from a band director’s perspective, my purpose is only to spark your creativity. You’ll be able to adapt some of these activities (and you can create your own innovative versions) to escort your students back toward their best learning with a memorable day. Here’s a short list to jump-start your imagination:
- Re-Record the Concert (or a single student-favorite piece): Then, play the two recordings in succession. What was different, and why? If the students performed much better on one recording than on the other, what’s the explanation? If the recordings are made in two different venues (e.g., the stage and the band room), can students hear the acoustic difference? If there are notable problems in either recording, can the students suggest improvements? If so, it’s also recommended to attempt a third recording, putting the students’ own suggestions to use.
- Modified Seating: This is a blank canvas, limited only by your creativity and physical space. Some possibilities include:
- Simply mix up the seating, but be sure to provide careful instructions to avoid chaos! (e.g., when they may move; where they can/cannot sit; how long they’ll have to complete the move). Above all, “this is a quiet move, and protect your instruments!”
- Reverse the seating, moving row 1 to the rear, and the last row to the front. Similarly …
- Ask the winds to face the rear: They’ll be facing the percussion section, which also gives your percussionists a novel experience. Additionally, your percussionists’ performance (and behavior) improves, because you’ll be conducting from their location.
- Use SATB seating: Reorganize the instrumentation into choral-style groupings (e.g., put all Soprano-functioning instruments on the conductor’s far left, and move through Alto and Tenor groups to reach the Bass instruments on the far right)
- Rotate rows: 1-2-3-4 becomes 2-3-4-1 or 3-4-1-2. This process can be used many times to build students’ listening skills.
- Rehearse “in-the-round” with the conductor at the center of the room. Or, perhaps line the winds along the four walls of the room, and leave the percussionists in the center.
- Space out the seating: If you have access to the auditorium during class, the wind players might be seated at wide intervals throughout the audience-space, while the percussion section lines the stage apron, as you conduct in the pit area.
- “In the velvet envelope”: If possible, compress your ensemble on the stage with all curtains entirely closed around the group. This dry environment—with all echoes and reverberation reduced—allows a unique listening experience, and teaches an irrefutable lesson about note-lengths, ensemble phrasing/breathing, blend, and more.
- Recital Day: Some of the student soloists and chamber groups within your ensemble are ready for a “public” performance. Your Recital Day meets two important objectives. First, the recital performers get the thrill (nerve-wracking though it may be) of performing for a live audience. As importantly, with your careful guidance, the remaining students will learn all of the important components of appropriate audience behavior. When your students are behaviorally ready, consider a full department Recital Day with the band, chorus, orchestra, and other music classes all combined.
- “Expression Explorations”: Ask the ensemble to replay a known, comfortable piece (or a brief excerpt from one) several times. Each time, apply a different style, mood, dynamic, articulation, or other interpretive elements. A march-style excerpt in 2/4 might be played instead as a Chorale by applying a slower tempo and using 4/8 meter. Or, for example, something marked Joyously might be played with a replacement marking of Doloroso. For more engagement, ask the students for suggested alterations.
- Percussion Day: Although this project requires significant pre-planning, it is a very likeable one-day event. It may be essentially a percussion feature with a simple, thickly-scored band accompaniment. “Advertise” what the class is going to do, and then use salesmanship to get students to buy into it. A scripted version might sound like this:
“I’ll bet hardly any of the percussionists think, ‘Oh, I could play that clarinet solo better!’ but, at the same time, I’ll also bet that some of you sit there and think, ‘I know I wouldn’t drop my sticks,’ or ‘Boy, that pulse isn’t so good!’, or ‘I can’t believe that kid can’t even crash two cymbals together!’” (etc.) “Well, I’m going to give you a chance to PROVE it! There’s a sign-up sheet on the bulletin board for ‘ALL-PERCUSSION DAY.’ If you’d like to try a percussion instrument, put your name on the sign-up sheet. I’ll give you the music tomorrow, and you’ll have Thursday to learn your parts (they’re SIMPLE parts!). We’ll play it in class on Friday. Percussionists, you can be mentors if you want to help people learn their parts, or you can just sit out and listen to what they can do. After we play ‘All-Percussion Day,’ then we’ll re-play the same piece with YOU (percussionists) playing the parts. Should we record those two versions for comparison?”
As a specific example, I owned “Devil in a Blue Dress” from Row-Loff Productions. The piece has easy wind parts, and can accommodate snare drum(s), quads, bass drum(s), crash cymbals, bells, xylophone, marimba, vibes, tambourine, suspended cymbal, drum set, and timpani. Most of those parts can be doubled if you have the gear (even if you borrow from another building), so you could allow perhaps 20-to-25 wind players to participate as percussionists. It can be a mess for you as the teacher (think of the preparation: printed parts, instruments, sticks/mallets, etc.) so get your section leaders or officers to buy into it for the biggest share of the prep and clean-up. Still, in my experience, students really think this is a very fun activity. If nothing else, the wind players can develop a new level of understanding (and patience for) the percussionists’ many responsibilities.
- Body Percussion: It’s probably better to have notated parts available, but your entire ensemble will enjoy playing a rhythmic ensemble with finger-snaps, hand-claps, thigh-pats, foot-stomps, and other effects. With careful preparation, you might also teach the various parts by rote, and/or the students themselves can create ostinato parts which can be layered to create the full ensemble. For example, “We’re in 4/4 meter, and we’re going this fast. Ava, can you finger-snap a two-measure rhythm? Great! Now, everyone in row 1, can you learn that please? One-two-ready-go.” Have fun!
- Part Rotations: This might also be described as reassigning parts within sections. For example, clarinet 1 plays third part; clarinet 3 plays second; clarinet 2 plays first. Some ensembles use this concept quite regularly. I’ve found this activity to be particularly effective. A scripted lesson plan might read like this:
“Let’s have all the flutes, clarinets, ALTO saxes, trumpets, horns, and trombones rotate to a different part within your section. If you were playing 2nd, move to 1st. If you were playing 3rd, move to second. 1st players, go to the bottom. Now, let’s replay the excerpt we’ve already ‘perfected’ … can you make it sound EXACTLY as good?” [“What did you learn from that?”]. Consider the value of recording the effort for playback.
- “The Great Instrument Exchange”: This certainly does require advanced planning. You’ll need extra reeds, cleaning/disinfecting materials, printed music, and more. I used this only with my (pre-COVID) Wind Ensemble—older kids whom I could trust—but they loved it and it became a favorite tradition that students looked forward to every year. I’d let them pair up: Two friends who play different instruments would teach and learn from each other.
- One full class-period is devoted to learning assembly, holding/posture/hand-position, tone production, and the basic fingerings required to play a Level I piece. I borrowed a beginner band tune from the elementary school, and gave each player the matching music for his/her “new” instrument.
- On the second day, we’d review in the same pairs of students (which can still happen without seating as a full group), and then assemble for the “full band” experience. I made it even more fun by pretending they were actual beginners, and I’d speak to them like band directors typically talk to 4th & 5th graders (cue the laughter and smiles).
- Finally, we performed the piece, which I would record and play back for them as they were cleaning and disassembling instruments, carefully and appropriately with their mentor-partner’s guidance.
- Random (or categorical) sight-reading: Allow students* to choose a number or other file-description—“I’ll choose 721!”—which refers to a random piece in your major ensemble’s library. With your pre-trained assistants’ help, you can distribute the parts quickly. Then, take the ensemble through a standard full-ensemble sight reading sequence; search Texas and UIL Sight-Reading for descriptions. Not only does this activity focus the ensemble, but you can also discover pieces that your students might enjoy for next year. Moreover, you’ll be able to observe a set of concepts (especially meters, key signatures, and specific rhythmic figures) that will guide the future of your lesson planning. That is, if the students read cut-time poorly, or play wrong notes in the key of G-flat, then teach them cut-time and work at G-flat!
As an alternative, your library might have separate locations for marches, pop music, fanfares, contest pieces, transcriptions, etc. Or, perhaps your library is categorized into levels-of-difficulty. With such an organizational structure, you might say, “We’re going to sight-read the seventeenth piece in that Marches drawer,” or because your band is currently at Level 4, “Let’s sight-read and record a Level 2 piece … can you sight-read the musical markings while playing in tune AND making beautiful phrases?”
* Students who choose might be volunteers, or you might select the student with the birthday closest to “today.” Or, perhaps you’ll ask a relevant question (“without looking, who can name the arranger of the first piece on last night’s concert?”), and select the student who provides the correct answer first. Use randomness, including a digital “random picker.”
- Revisit earlier repertoire: Students—almost universally—tend to enjoy this activity! Select and pre-organize a piece that the students have already played in their past. Perhaps it’s from a concert earlier in the year but, for a more effective activity, choose a piece they played long ago. If you’re directing the 8th grade band, for example, consult with the elementary band director. Ask your colleague, “When they were in 5th grade, what was their very favorite piece?” The students will love seeing the parts they played as beginners, and they’ll immediately notice their own development because they can observe, “What was once really hard is now easy.”
But a great objective for this activity comes by using the piece as a vehicle for exploration (specifically, “Can we read this music and apply your musicianship to it? Use your very best phrasing, and observe all dynamics really carefully. Let’s make this a fluent sounding version.”) If serendipity is on your side, you might find a years-old recording of them as beginners; with it cued up, you can then record today’s version of their accomplishment, and play both recordings for a fun comparison.
- Recording & Playback Experiments. Record and playback a lot! Take just a short excerpt (e.g., 16 bars) and record a baseline version. Listen to the playback:
“What are three IMPORTANT suggestions/goals? Good—now write those markings onto the music. Let’s practice it once and then we’ll re-record it.”
Then, play the initial recording and its follow-up attempt consecutively so they’ll hear the difference.
“Hey, do you mean if we determine what we want to sound like and then strategically attempt to meet our goals, we can actually IMPROVE?!? Wow!!”
- Marching games and contests.
- March single-file around the auditorium’s perimeter, with and without instruments. Perhaps your percussion section plays a cadence (or even a simple “Tap-Tap-Tap”) to keep a steady pulse for the marchers. You’ll be able to view and discuss the intervals (distances) between marchers from the inner, audience area of the auditorium. Students can look across the space to see, and hopefully emulate, others’ posture, step-size, etc. Add “Mark-time, Mark,” “Band-Halt,” and other such commands … which might lead to funny results while students bump into the backs of others. “Hey, that means you should stop marching forward!!” This activity is for skills development with basic marching techniques and common commands. Later, you can assemble students into ranks/rows to work at peripheral vision and precision guiding.
- Have fun with drill games using small groups. You might choose older, more mature volunteers who will enjoy this “guinea pig” role in front of their peers. As an example, assemble four students side-by-side into a rank, and give them a short series of commands strung together. The students must memorize the sequence: (e.g., “Mark time for 8. Forward March for 8. Mark-time 8. Slow turn-to-the-left 8. Forward 8. Mark time 8. Halt.”). Count them off, and the fun begins! Their success gives others confidence, and a desire to try it. Their lack of success leads to successive attempts. Keep the excellent guidance (as in “Recital Day”) to maintain appropriate full-group behaviors. Ultimately, you can use a large space (gym floor, stage, parking lot) to improve marching techniques for the full band.
- Repeat either of these processes with basic playing.
- For example, provide the “Horns Up” command and allow the ensemble to play a simple whole-note scale while marking time in place. “Each time you play a new note of the scale, you should be on your left”
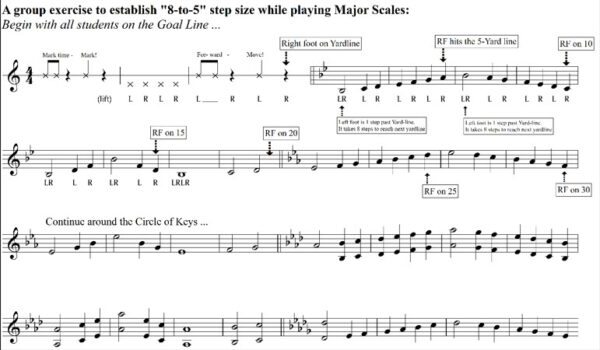
- Or, using a Company Front on the football field—with all students on the goal line—play the known scale (e.g., B-flat or F), now in double-whole notes, as the students “Forward March.” This strategy builds the 8-to-5 step size; that is, 8 steps will cover exactly 5 yards. At the end of eight counts, the right foot touches a new yard line; the next double-whole note begins as the left foot takes the first step past the yard line.
- Create your own activity appropriate to your students’ age level or experience. The following example might be good for the middle school or high school level, in a band where students are already comfortable playing scales around the Circle of Fourths/Fifths.
This activity also solidifies the 8-to-5 step size. Finish by selecting volunteers who would like to perform this sequence with their eyes closed while their Peers look on. “Will they be on a yard-line on their 8th and 16th steps? Let’s see!!”
Clearly, this article offers only a short glimpse at the tip of an undiscovered iceberg. Your classroom, your students, your building/department, and especially your individual style as a teacher will guide you to create perfectly matched activities. There’s no doubt, however, that your students will appreciate these out-of-the-ordinary experiences. Moreover, the conversations at home—“what did you do in school today?”—will certainly produce enthusiastic discussions about your class. And tomorrow, your traditional rehearsal techniques will get better results from an excited, rejuvenated ensemble.
Please feel free to contact me (r200lina@gmail.com) for clarifications or additional information. I’ll return within a few months with an article filled with suggestions to help your reach your school’s non-music students using music; these will be ideas to serve your music students as well as those you’ve seen in the halls, cafeteria, and stairwells, but whom you’ve never met. For now, however, I encourage you to share your innovative ideas on today’s topic by using NAfME’s Amplify platform. In our music education community, we can all learn so much from each other!
About the author:
 Retired Director of Bands at Maine-Endwell Senior High School in Endwell, New York, and author of Strategies, Tips, and Activities for the Effective Band Director, NAfME member Robin Linaberry is a multi-faceted musician, highly regarded for his work as a teacher, conductor, performer, educational mentor, clinician, and speaker. He is a state Chair for The National Band Association, conductor of the award-winning Southern Tier Concert Band, and Head Director Emeritus for the American Music Abroad Red Tour. Robin has been published in numerous journals, honored by many organizations, and consistently lauded for the effectiveness of his engaging rehearsal strategies.
Did this blog spur new ideas for your music program? Share them on Amplify! Interested in reprinting this article? Please review the reprint guidelines.
The National Association for Music Education (NAfME) provides a number of forums for the sharing of information and opinion, including blogs and postings on our website, articles and columns in our magazines and journals, and postings to our Amplify member portal. Unless specifically noted, the views expressed in these media do not necessarily represent the policy or views of the Association, its officers, or its employees.
Published Date
August 29, 2023
Category
- Ensembles
- Repertoire
Copyright
August 29, 2023. © National Association for Music Education (NAfME.org)


